GSoC 2022 - “RIoTPot: A Shapeshifting Honeypot”
In this post we describe our GSoC 2022 experience to enhance RIoTPot, a honeypot with focus in IoT and OT protocols. The project was in collaboration with The Honeynet Project, a non-profit security research organisation (more information in the sidebar).
The project spawned from early June to mid September. During this time, we worked closely with our mentors Emmanouil Vasilomanolakis and Shreyas Srinivasa, two fantastic researchers with a large background in the field of Cyber Security and passion for honeypots.
Regarding the honeypot, we draw inspiration from other projects such as HosTaGe, analysing field gaps and other features that will take RIoTPot to the next level.
The post first gives a short description of our project proposal and mentors. Then it jumps directly into the project report. At the end of this post we include a How to example to run the honeypot, and what we consider a list of next steps organised by the effort necessary to accomplish them and their potential impact.
1. Project Description
1.1 Proposal: Advance Device Profiles
To enhance RIoTPot with pre-set and custom device profiles. The profiles will be displayed using an interface that users can toggle to customise their experience. Profiles are provided with services, banners and other device information. This configuration should be available to the user while using the application.
1.2 Tentative Timeline
- June-July: Basic API to communicate between the web interface and RIoTPot configuration and state.
- July to August: Create behaviour trees and a switch-based view. Hand-in phase 1
- August to September: Implementing a number of profiles and cleaning the documentation.
- September until the end: Hand in phase 2 and polish the application.
1.3 Mentors
Thanks to my mentors! they help me stay on the path, define the objectives of the project, and illuminated me with bright and fresh ideas. Without the original minds of riotpot this project could have not been possible. I hope we continue collaborating in the future on whatever project :)
2. Report
This project report contains useful information as of how we approached the project. To make it simpler, we included only relevant information on how we tackle the different issues and the requirements defined in the scope of the project.
Since the size of the project was relatively small and the proposed changes had a heavy impact on the previous version, our work was rather fluid in terms on how to implement our requirements, aligning when necessary through internal calls and Slack messages.
In the following Section, we introduce our project requirements, including useful links to the epic issues created in our Kanban board for task management and prioritisation.
Then in Section 2.2, we briefly walk over the architecture design and the mock for the UI in.
In Section 2.3, we continue with the implementation during the first and second half of the project.
Section 2.4 summarises the contributions to the project, and lists a number of issues remaining in the project.
The reminder includes a How to guide and a list of next steps for future development.
2.1 Requirements
The main objective for GSoC 2022 was to initiate a transformation to make RIoTPot a honeypot framework and improve the usability of the overall system. In addition, the system must include profiling capabilities (e.g. to mimic realistic devices through templates or create a customised experience). We agreed on the following “epic” features as the definition of “done”.
2.1.1 Profiles (#73)
One of the major initiatives to continue with RIoTPot is to make the application feel like another system.
To do this, riotpot must include new methods to load what we call profiles.
For this project, a profile will define a set of services typically exposed by some device.
In addition, riotpot must be capable of changing on the fly, meaning that users will be exposing and closing services while riotpot continues functioning.
We defined this epic in the proposal of the project, as we believe this must be a core function of the application.
2.1.2 Proxy (#63)
As a framework, RIoTPot distances itself from handling the individual services and/or honeypots available in the system. The role of RIoTPot should be to provide an interface for attackers to communicate with these services, and focus on managing the availability of the services by exposing or hiding services on demand.
This change gives the ability to combine RIoTPoT with any other service (e.g. to use another dedicated honeypot as an endpoint). As the name indicates, this feature transforms RIoTPoT into a proxy manager to route the communication between attackers and services.
2.1.3 API (#58)
The system requires a standard method to modify the state of the application. Exposing API endpoints facilitates other applications to interact directly with the system through common methods.
2.1.4 UI (#57)
Creating a UI interface that communicates with the API will enhance the user experience, and welcome new methods to interact with the data.
2.2 Design
The system has been redesigned to allow for the intended changes. Since riotpot will no longer manage containers on its own, we decided to remove the need for virtualisation entirely and scope the capabilities of the system to simply expose proxy endpoints and an API.
Figure 1 shows this architectural design in practice.
Services remain hidden and active in the host and connected to the same network as RIoTPot; however, these services are not accessible through the internet.
This will give us the flexibility to manage connections in the future, perhaps upgrading or downgrading connections.
The webapp uses the API to modify riotpot and consume information,
Finally, TCPDump observes the communications between riotpot and attackers, and stores the traces into.pcap files, which rotate when they reach a certain size.
Separating the duties of riotpot and the rest of the components reduces the number of components necessary to run the system while retaining previous core capabilities. By doing so, we streamline future improvements to focus on either proxies and middlewares or the API and the UI.
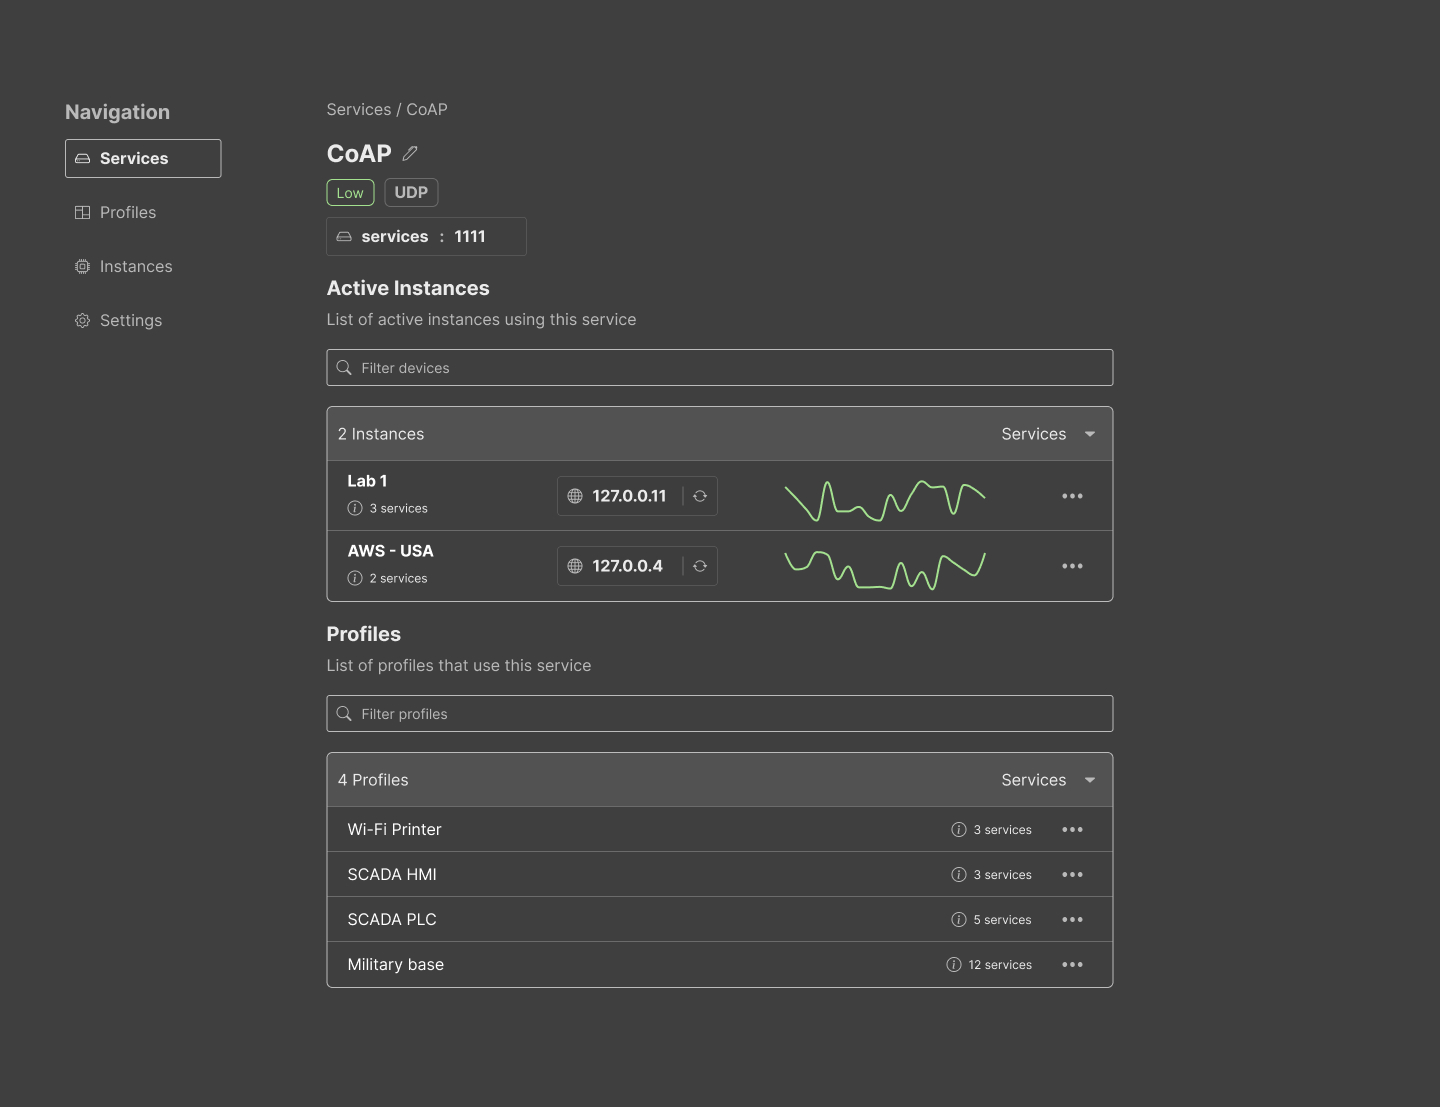
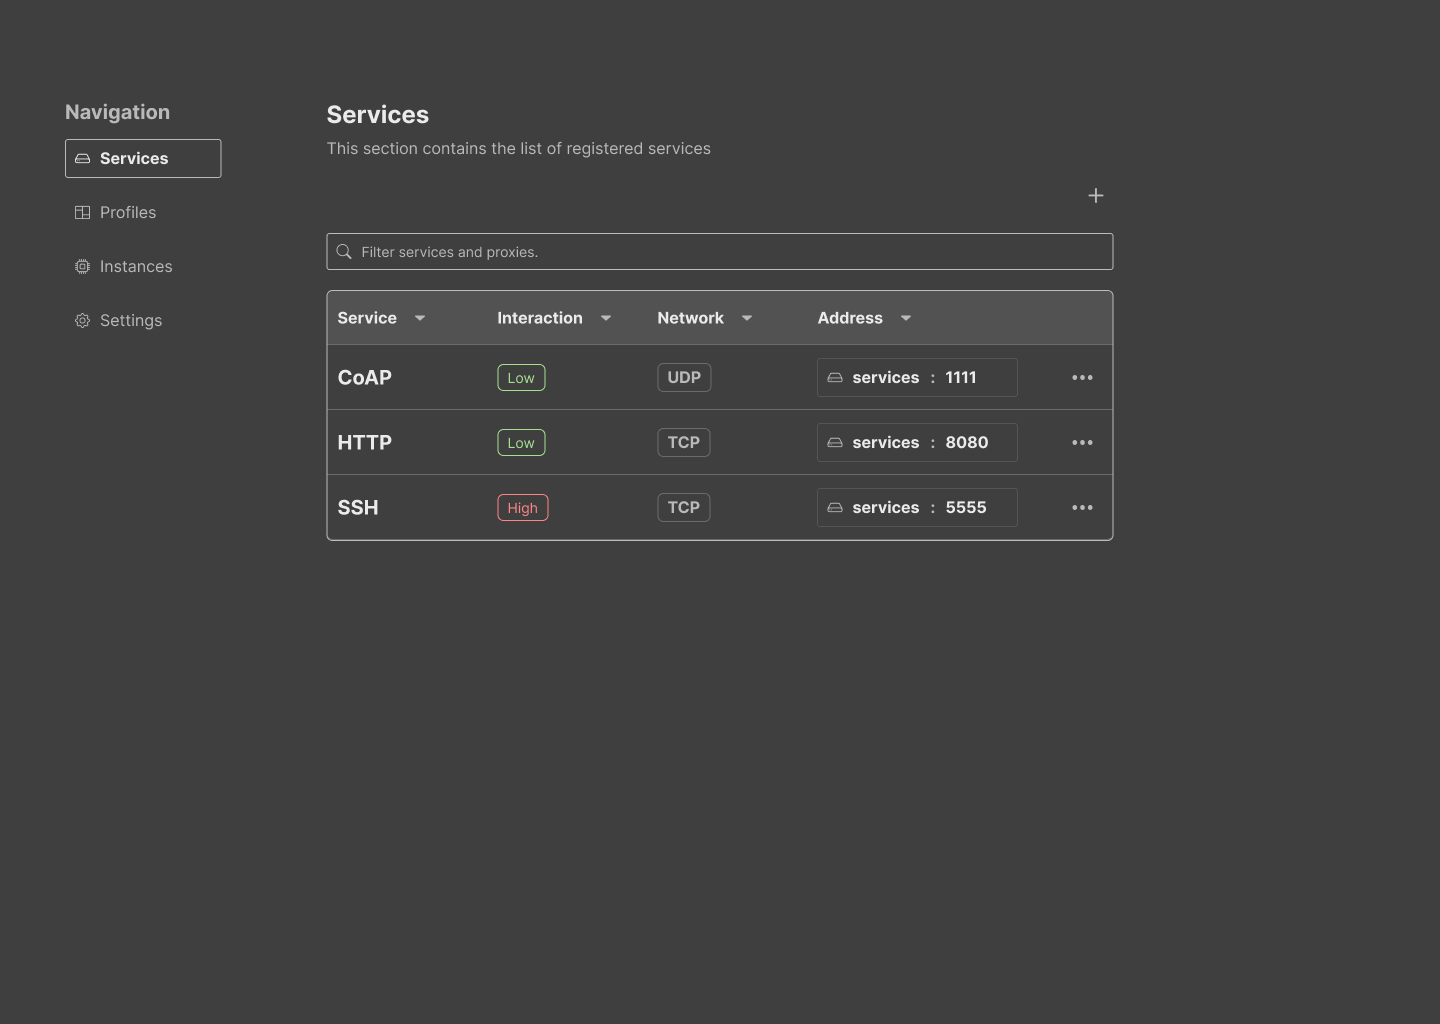
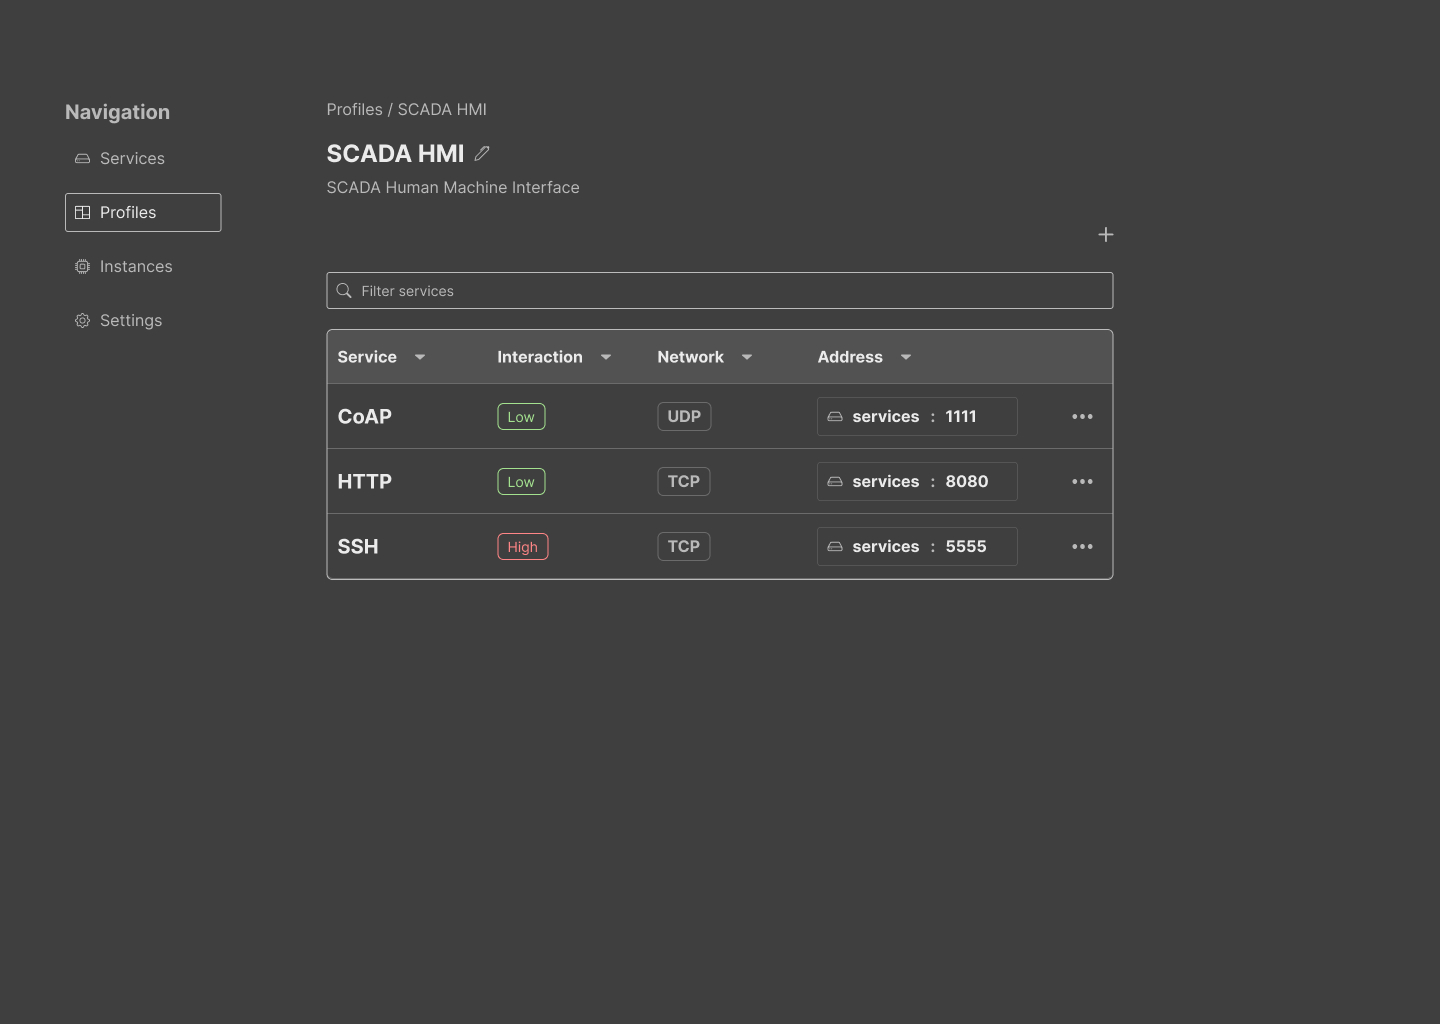
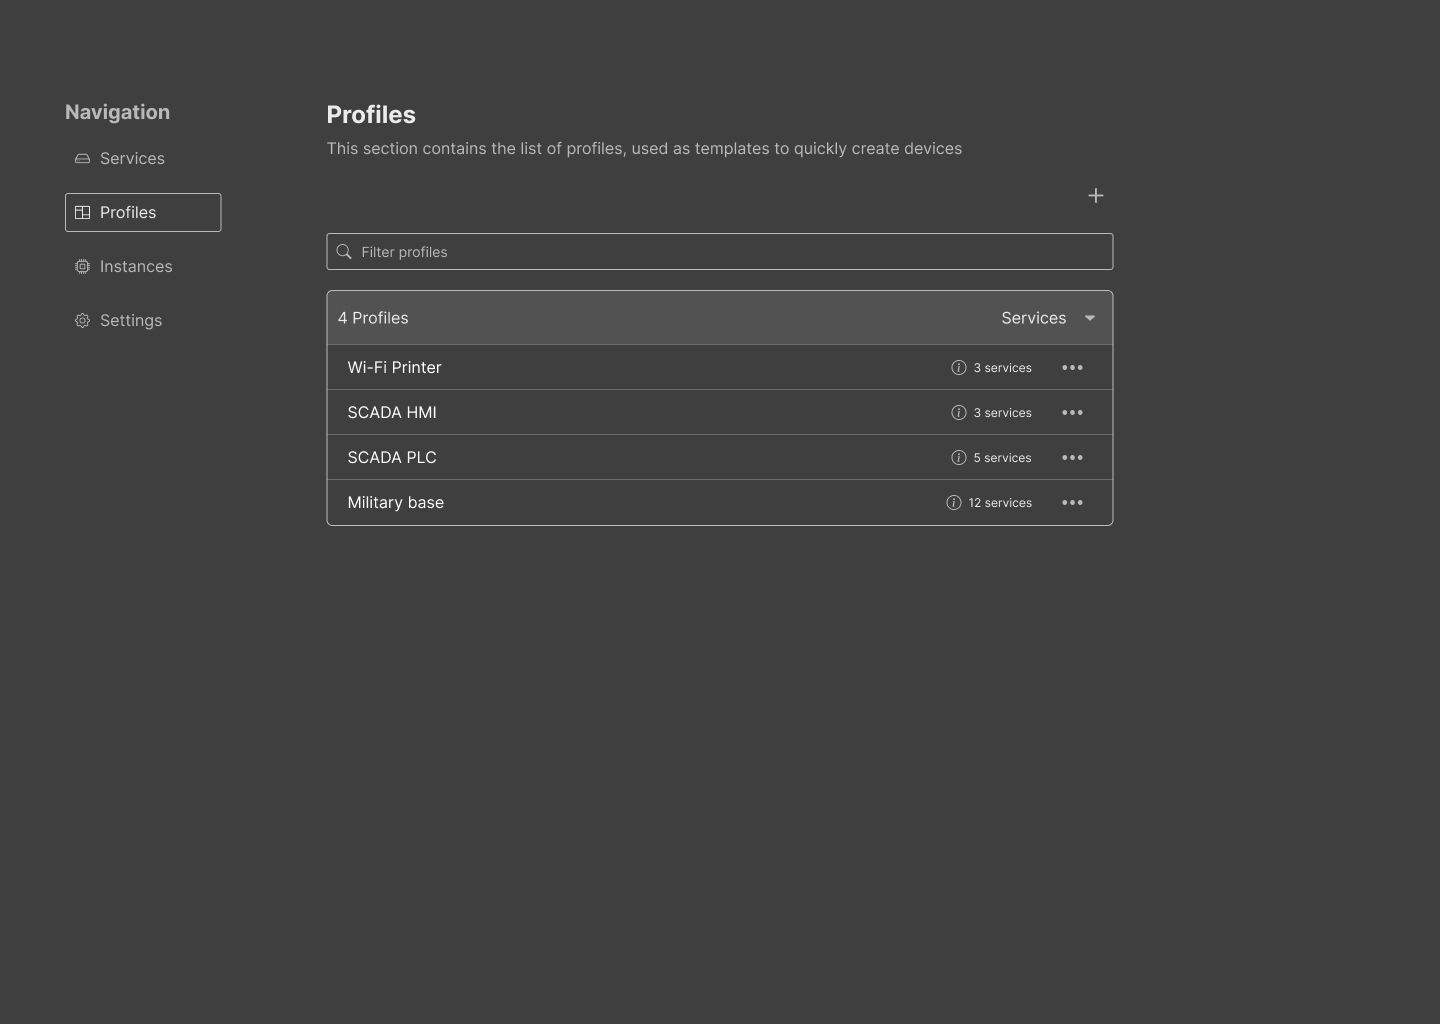
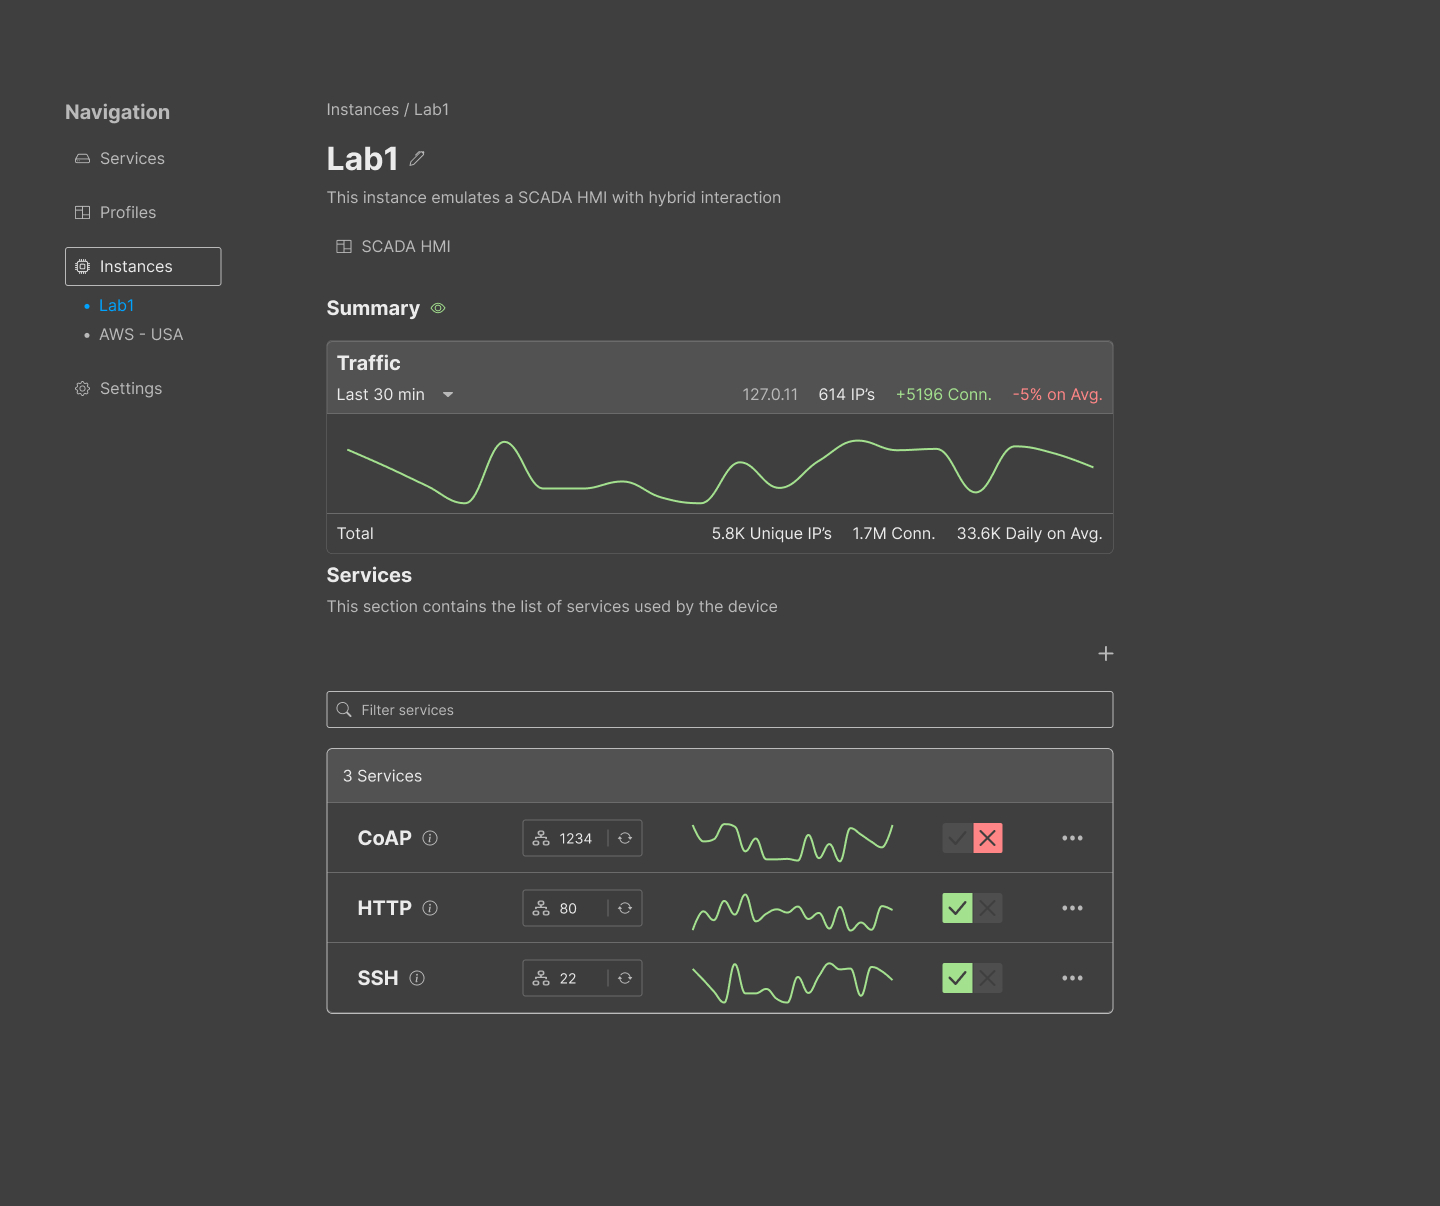
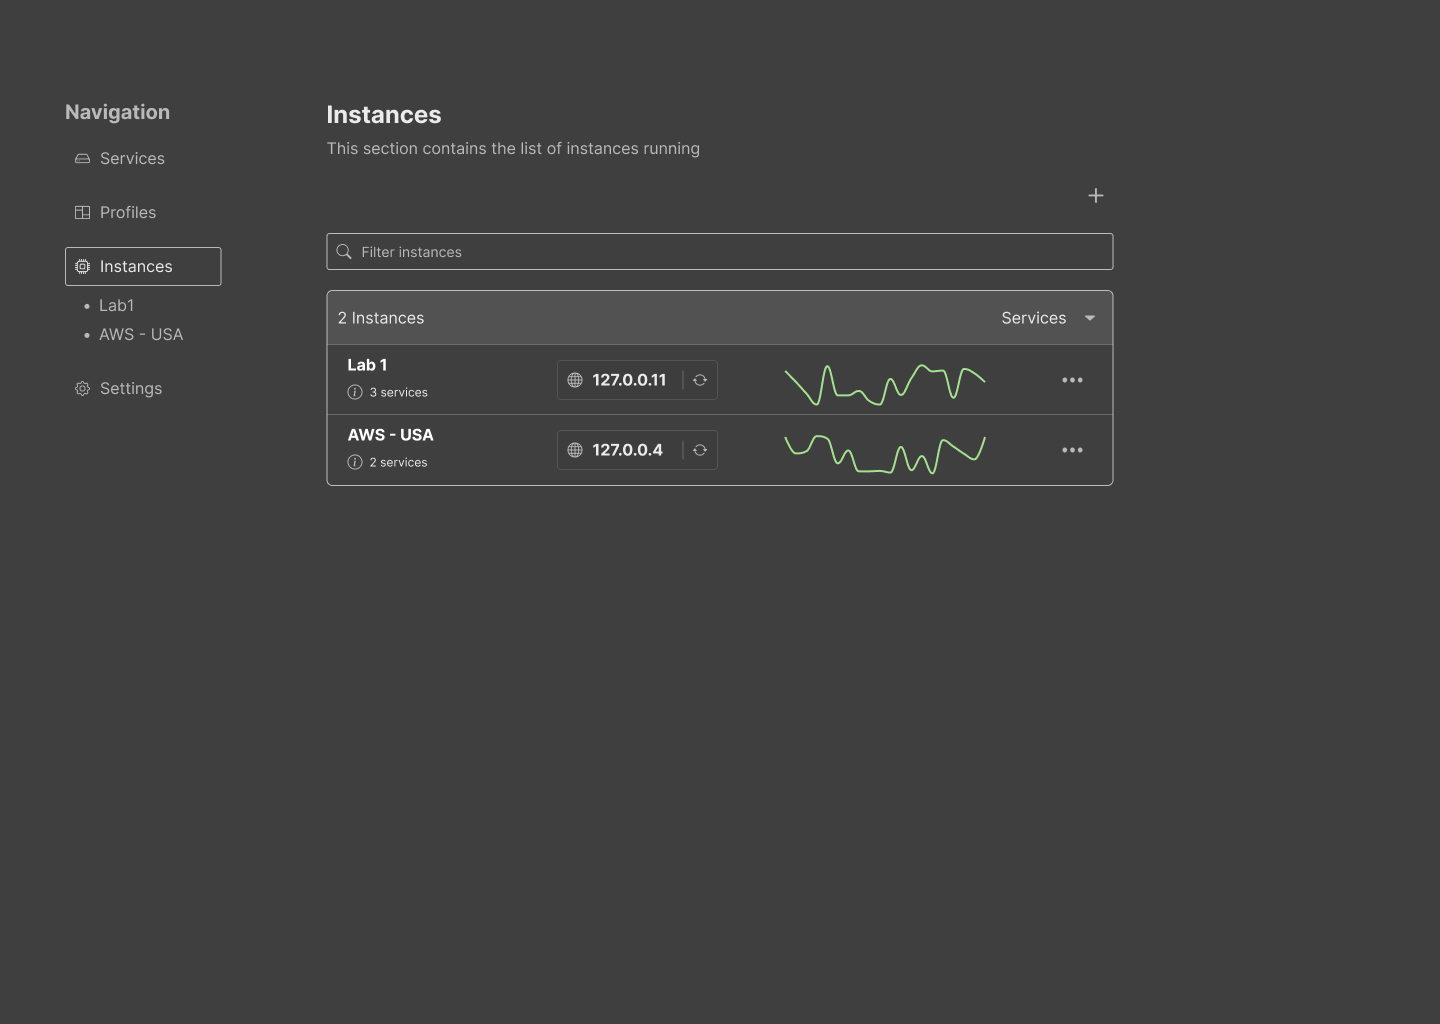
Regarding the UI, we mocked the application using Figma to set the basis of the application and the way users would interact with it. Mocking the application sets expectations in terms of the scope of the project and the functionalities that should be included.
While a mocking only represents the initial draft of our prototype, it is beneficial to align on core elements and other components that need prioritisation. For example, insights on the current state of the individual services and other telemetry were a nice addition to the mock to understand the end-value of the software; however, including pre-set profiles was a higher priority for this project. We aimed to create a consistent and simple theme with basic features. The following gallery contains images of the six core functions of the UI.
2.3 Implementation
Due to the breaking changes introduced in our design, the first point of action was to map the application processes, and identify elements that we could utilise. We spent a great deal of resources to refactor and document the code in place (#62), and pacing our next steps. During the first half of the project we dedicated our efforts to the internal implementation of the honeypot. We discuss this process in more detail in Section 2.3.1. The second part of the project focused on implementing of the UI, as described in Section 2.3.2.
2.3.1 Shaping The Honeypot
From the core, we only maintained the plugin honeypot services that provide low interaction emulation, the rest was either set for refactoring or removed altogether. Furthermore, we identified three streams for enhancement: Services, Proxies and the new API. Finally, we settle on the observer and factory patterns to manage the state of the services and proxies globally, while using a REST API to communicate with the UI.
A. First, we included a standard library to standardise the logging output (#53). Due to the requirements of honeypots in terms of bandwidth and resources, we decided to use a logger with zero memory allocation. Our choice was zerolog, an open-source logger for JSON output.
B. Then, we developed a similar manager or “factory” for both services and proxies that provides an interface to perform insert, deletion and filtering.
In addition, we choose to link services to proxies as a one-to-one relationship.
However, we decided to limit the awareness of this relationship to the proxy, instead of creating a relational manager.
Although this was a decision to maintain simplicity, we acknowledge that there are better ways to track this relationship.
Looking now into the Proxy properties, we identified three main functionalities that any proxy must have:
- To start and stop the proxy on-demand. This feature checks the availability of the port in the host and starts listening for connections in the given port. Once the proxy is stopped, the socket is freed and the host closes the port.
// Function to stop the proxy from runing
func (pe *AbstractProxy) Stop() (err error) {
    // Stop the proxy if it is still alive
    if pe.GetStatus() == globals.RunningStatus {
        // Close the channel
        close(pe.stop)
        // Close the listener
        pe.listener.Close()
        //Wit for the connections and the server to stop
        pe.wg.Wait()
        return
    }
    err = fmt.Errorf("proxy not running")
    return
}
- To include middlewares that interact with the transiting connections from attacker to service.
Proxy middlewares were created to intercept connections from attackers to the honeypot, and take further actions such as dropping the connection, upgrading or fingerprinting the attacker (#64).
For reference, the connection becomes
attacker -> proxy -> middleware -> serviceThe implementation has been limited to create the structure necessary for developing these middlewares, but no middleware was introduced during the project.
go func() {
    // Apply the middlewares to the client connection
    tcpProxy.middlewares.Apply(client)
    // Handle the connection between the client and the server
    // NOTE: The handlers will defer the connections
    tcpProxy.handle(client, server)
    // Finish the task
    tcpProxy.wg.Done()
}()
- To handle both TCP and UDP connections. Due to the variety of protocols available in common devices, the honeypot must handle both TCP (#65) and UDP (#66) connections. UDP connections in specific is a challenging topic, and complex to implement using Golang. We implemented a rather basic UDP proxy with room for improvement. However, middlewares were not implemented for UDP.
// Create a new instance of the proxy
func NewProxyEndpoint(port int, network globals.Network) (pe Proxy, err error) {
    switch network {
    case globals.TCP:
      pe, err = NewTCPProxy(port)
    case globals.UDP:
      pe, err = NewUDPProxy(port)
    }
    return
}
Moving now to the properties of the Services, we needed to differentiate between plugins and the rest of the services.
The main difference is that plugin services are placed internally (localhost) in riotpot.
Therefore, they need to be started, and must not be removed at any time from the register!
Since this feature could be beneficial for other setups, services can be locked to avoid unintentional deletions. Deleting a service means that the service is stopped and removed from the list of tracked services in riotpot. However, riotpot can not delete services from the system.
Info: By default, riotpot loads all the plugins included in the project and starts them even before the API is started. The list can be modified using a configuration file which contains the list of services that must be started.
Note: Plugin services are locked by default (i.e., can not be deleted), and this can not be changed
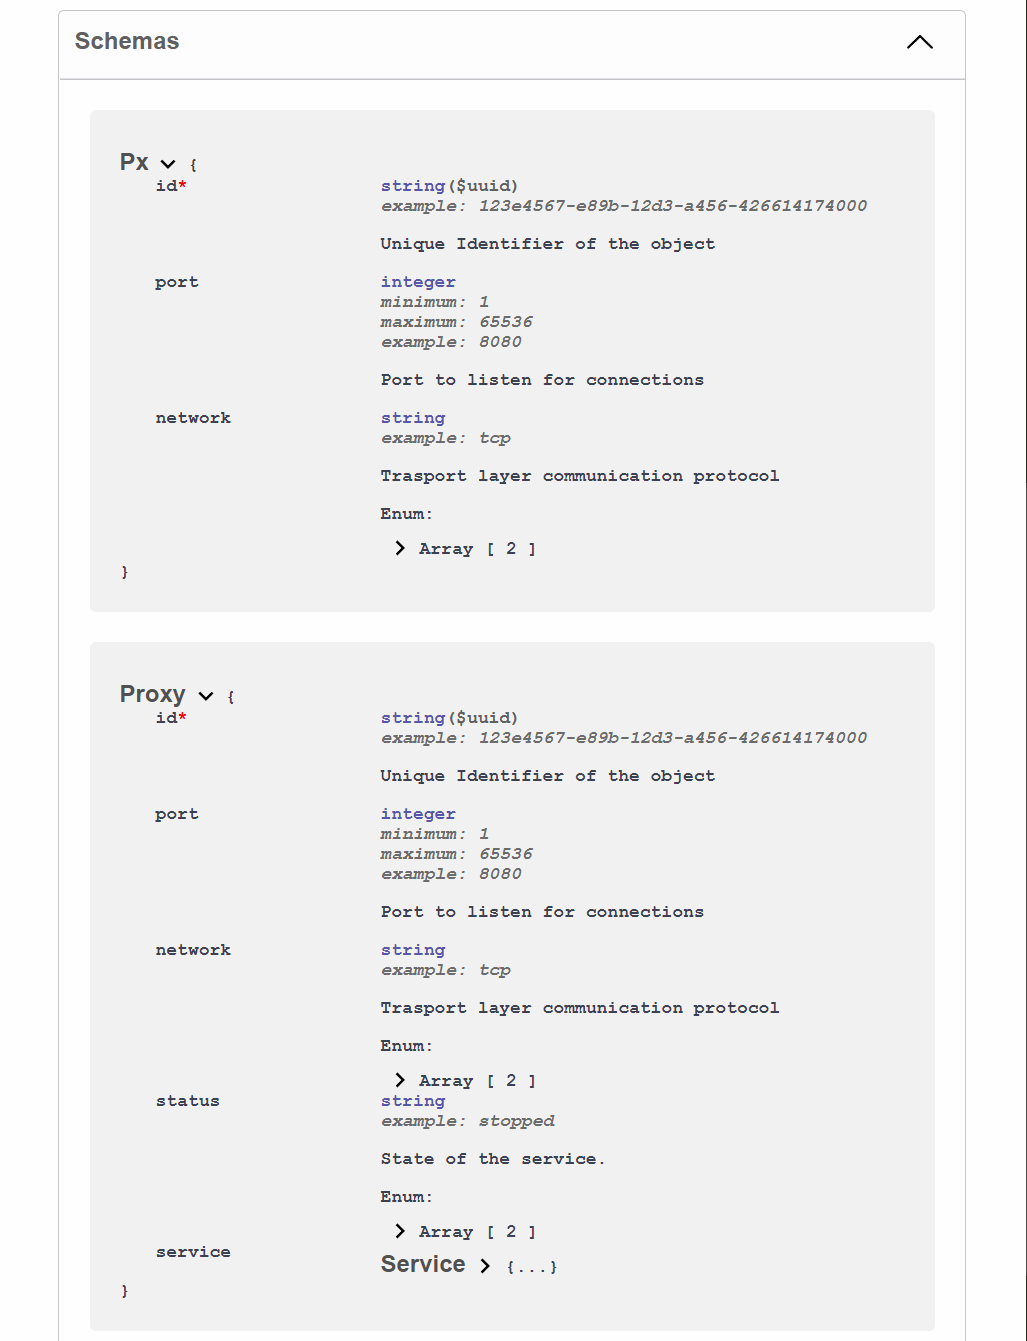
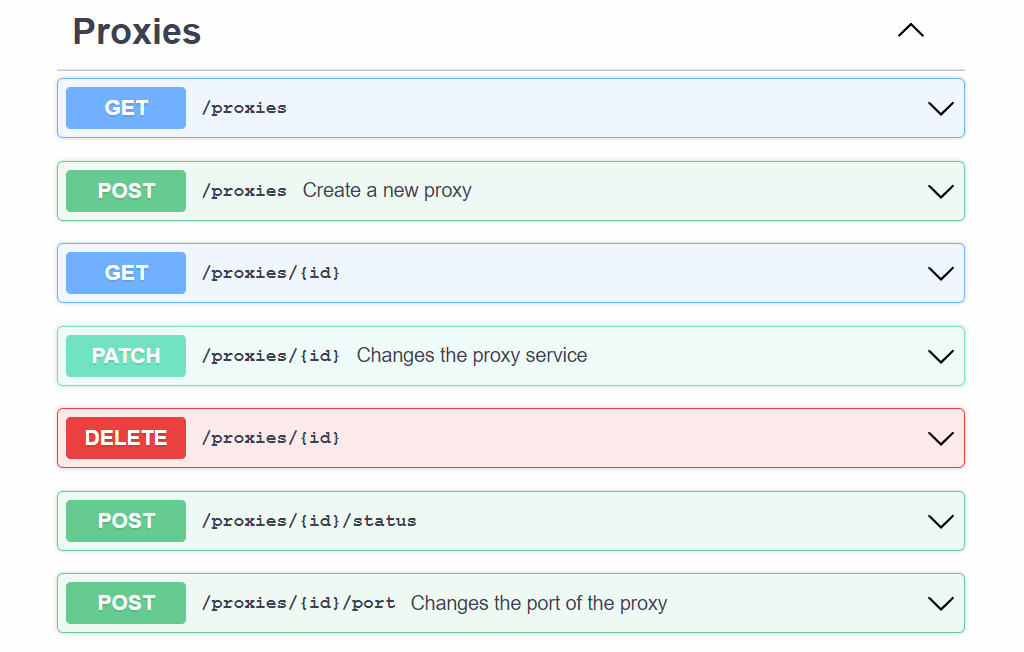
C. With a backend structure in place that we could modify, we turned to define API endpoints and routing structures. For this, we used gin, an open-source HTTP framework that simplifies serialisation and routing in golang. This too implements a zero allocation router that includes nested routing and supports Swagger documentation. Swagger is an open-source specification for documenting API endpoints.
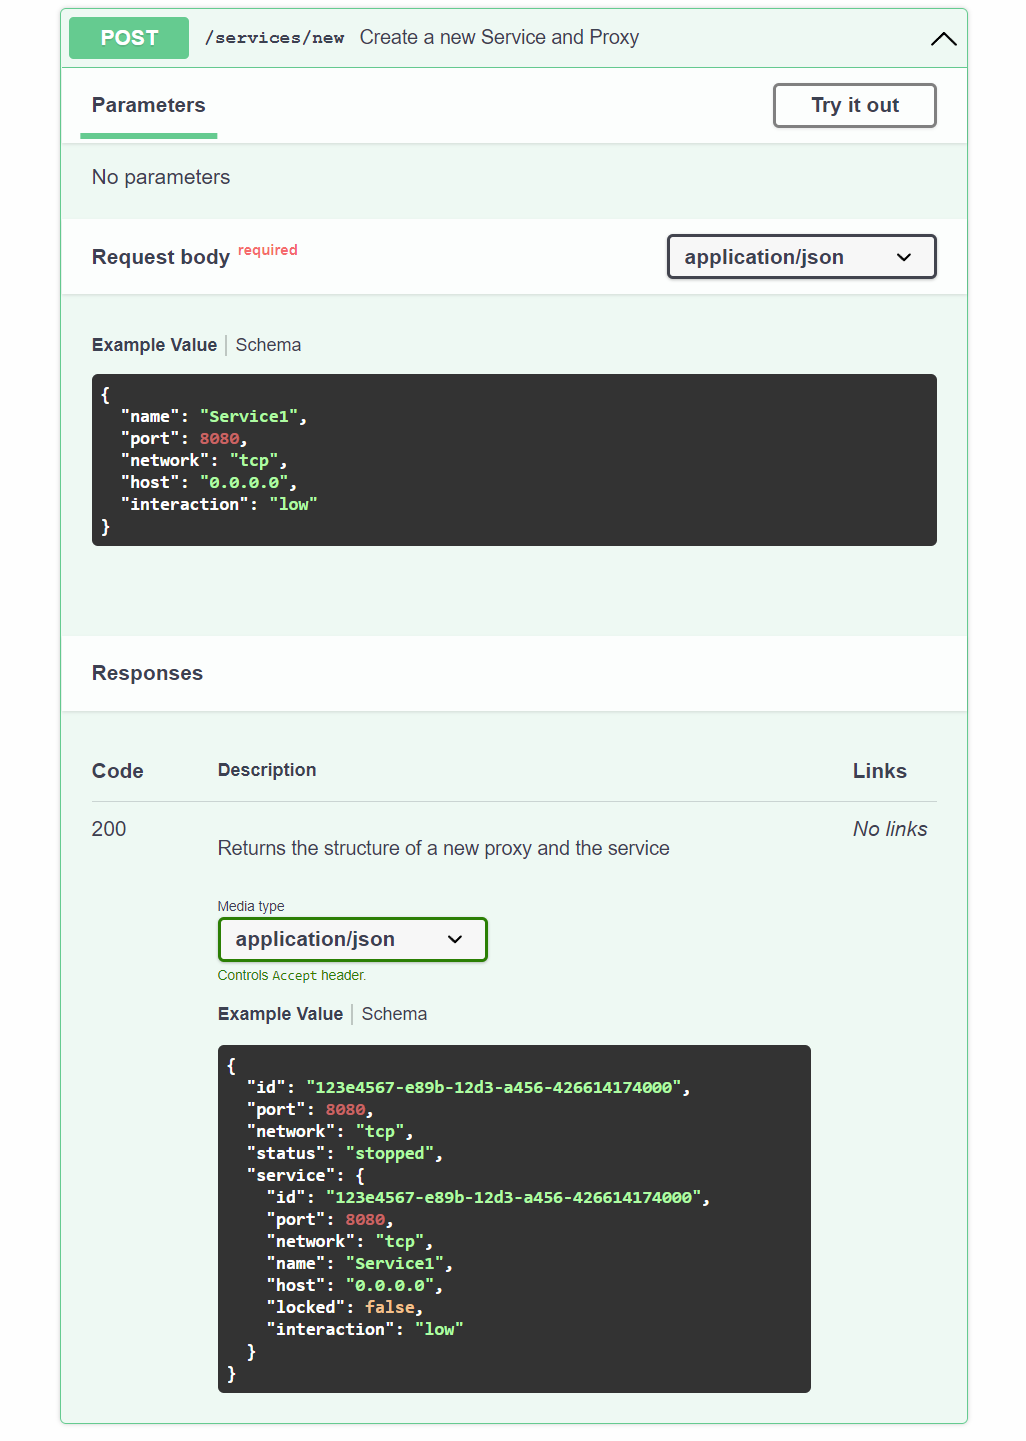
The API implementation is relatively simple, containing just enough endpoints for performing individual CRUD operations on both services (#68) and proxies (#67), and a reduced number of additional endpoints to simplify creating and deleting services already linked to proxies. Lastly, the Swagger documentation has been included as one of the API endpoints (#61), covering cases in where the UI is not an option.
func newServiceAndProxy(ctx *gin.Context) {
    // Validate the post request to create a proxy with a service
    var input CreateService
    if err := ctx.ShouldBindJSON(&input); err != nil {
        ctx.JSON(http.StatusBadRequest, gin.H{"error": err.Error()})
        return
    }

    nt, err := globals.ParseNetwork(input.Network)
    if err != nil {
        ctx.JSON(http.StatusBadRequest, gin.H{"error": err.Error()})
        return
    }

    ...

    sv, err := services.Services.CreateService(input.Name,input.Port, ...)
    if err != nil {
      ctx.JSON(http.StatusBadRequest, gin.H{"error": err.Error()})
      return
    }

    // Create a new proxy using the parameters from the service
    pe, err := proxy.Proxies.CreateProxy(nt, input.Port)
    if err != nil {
        ctx.JSON(http.StatusBadRequest, gin.H{"error": err.Error()})
        return
    }

    ...

    pe.SetService(sv)
    ret := &ServiceProxy{...}
    ctx.JSON(http.StatusOK, ret)
}
2.3.2 UI
Using our Figma design as a blueprint for the UI, we agreed on creating a webapp using a React stack. React is based on creating individual UI components and managing their state. This stack combines state-of-the-art technologies to create interoperable applications that can be accessed from the browser. In addition, we enriched the application with support for Typescript and SCSS. Typescript provides additional data types and type declarations required in modern applications. SCSS introduces structure and scripting capabilities to regular CSS.
In addition, we choose Recoil for our state management tool, instead of other choices such as Redux, or a separate database to manage persistence. A state management tool is a crucial component for React applications; however, it is often a trade-off between features and the necessary resources necessary to maintain it. What is more, it introduces new complexities to the stack, and new technologies to consider for developers. Recoil offers simplicity at the cost of weaker documentation and fewer features.
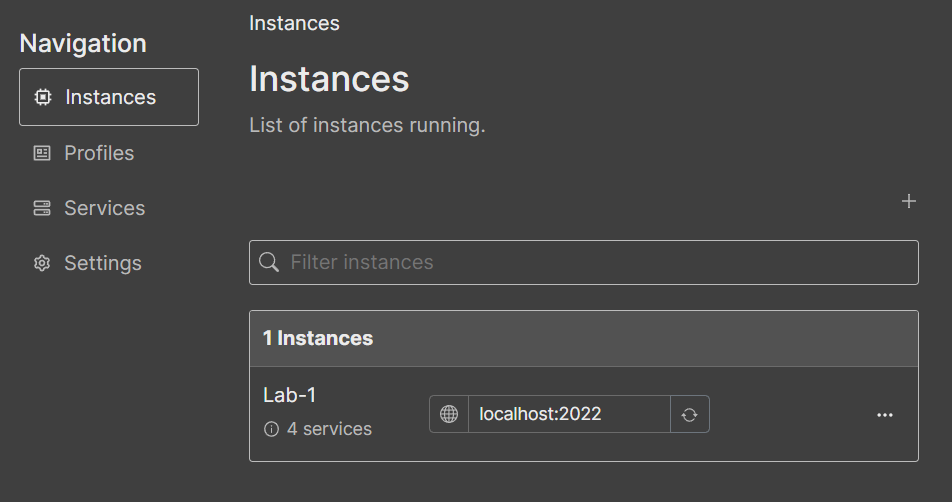
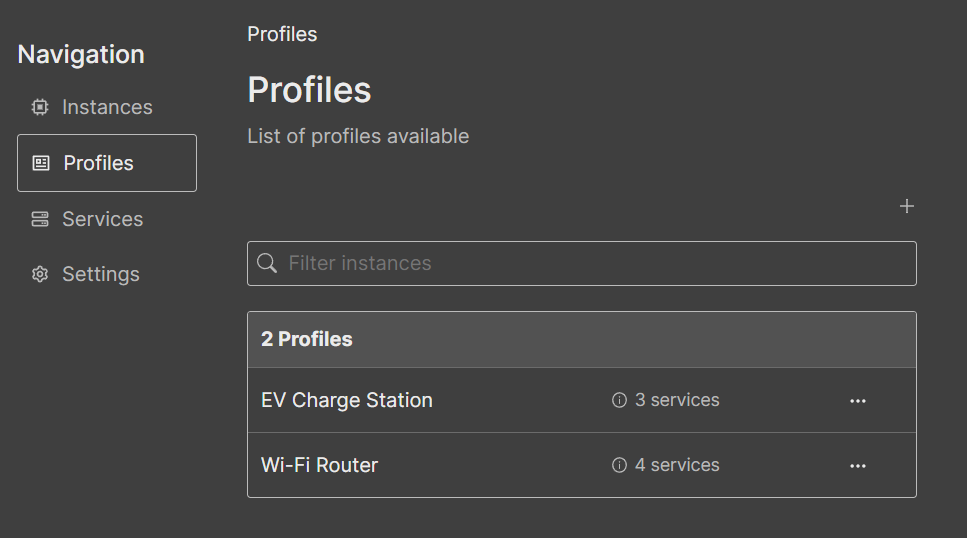
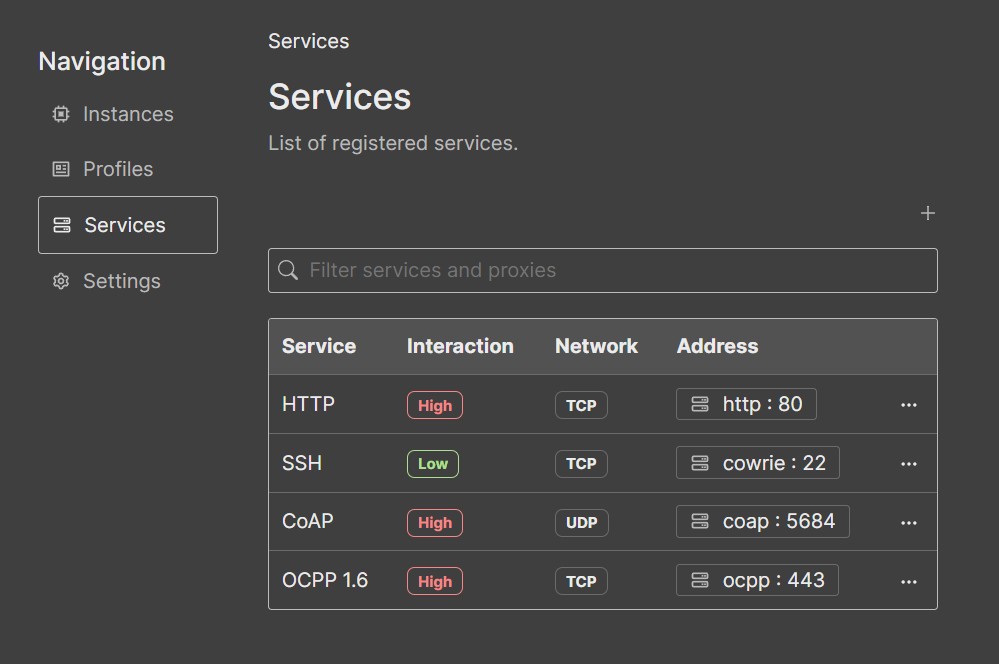
Furthermore, Recoil allows us to manage the state of the application and display content in our components, change the content on the go, and even upload pre-defined states on demand. This feature is directly related to one of our requirements, to offer pre-defined profiles to the user (#69), used to shape RIoTPot instances into realistic devices, and simplify provisioning instances with services. Therefore, the webapp maintains the state through mainly three pages (plus settings):
-
Services: This page contains the list of registered services (#71). A service is defined given a network protocol (UDP or TCP), the reachable address (host and port in where the service is listening), a name, description and interaction level. The interaction level is mainly informative, to differentiate low interaction honeypots from fully flagged services.
-
Profiles: The page contains the list of profiles available to choose from (#72). Profiles act as templates for instances. A profile contains several mixed services typically found in that type of device. For example, a not-very-secure router may expose services such as Telnet, Echo, SSH and HTTP. It is possible to mix low interaction with high interaction, or even similar services using different ports and interactions. We understand that researchers are curious, and RIoTPot does not want to limit its possibilities. New profiles just require a unique name; then, the user is free to add and remove services from the details view.
-
Instances: On this page, users can find registered instances and a summary of the current state of the services included in the instance (#70). Creating instances can be done by clicking on the “add (+)” button, which shows a dropdown with the list of available profiles to choose from as a template. However, users can choose to create their empty instance if they decide to do so. Choosing a profile as a template will create the list of services in the instance. Then, the user can decide to start and stop the proxies by simply clicking on a toggle button.
Note: The information included in the details of the instance is gathered through the RIoTPot instance API.
2.4 Summary
2.4.1 Commits
While the issues tracked in GitHub give an overall representation of the requirements and milestones, we did not use the tracking system extensively. We used a single branch for the whole GSoC instead of the typical flow of creating branches, forking and creating pull requests. While we acknowledge that best practices are always relevant, we preferred a simpler setup.
The Commits List spans from commit edbe15a8e2fca3fe6c3252646d7540e02173f493 to the last commit before 12/09/2022 (our GSoC deadline), under the username RicYaben and ryaben17.
At the time, the code has not been merged yet. The changes break the previous application; therefore, we decided to wait until the version has been revised carefully and we have fixed minor issues.
2.4.2 Contributions
In the following table contain we summarised the list of contributions to the RIoTPot project. It is important to mention that since the application has been heavily modified, it is difficult to map contributions. Therefore, the table includes just the milestones and features included in each application, rather than pointing at individual factors, or how they improve upon the previous version. Overall, we differentiate between RIoTPot and the UI. RIoTPot refers to the honeypot and UI to the web application.
| Application | Milestones | Features | Comments |
|---|---|---|---|
| RIoTPot | Proxy | TCP | |
| UDP | The proxy needs to be revised and further tested | ||
| Manager | |||
| Services | Plugins | Modified to use the new structure | |
| Manager | |||
| API | Proxies Endpoints | ||
| Services Endpoints | Added endpoint to create services with proxies in one request | ||
| Swagger | Added endpoint to show swagger documentation | ||
| Logger | ZeroLog | ||
| UI | Profiles | CRUD | |
| Services | CRUD | ||
| Instances | CRUD | Connects to the RIoTPot API | |
| Settings | load and download state from/to JSON |
In addition, we have modified the Docker files to work with this version, separated services in their container and network, and included other services (e.g. OCPP 1.6).
The major change to this is that we have removed the dependency from virtualisation tools, and left it as an option for the user.
Finally, we refactor the code to remove no longer necessary packages and artefacts.
However, there are leftover artefacts in the code that should be removed in future versions.
2.4.3 Known Issues
- SSH internal low interaction protocol crashes the application when a client closes the connection.
- UDP Proxy and Middlewares need to be revised.
2.5 Example Execution
Running RIoTPot is relatively simple.
-
Download riotpot from the gsoc_2022 branch in GitHub. Open a console and copy the following line (and press enter):
git clone git@github.com:aau-network-security/riotpot.git - To run it locally, you will first need to compile riotpot. Dont panic yet, we have included multiple helpers to aid you to do this in the form of
makecommands. In case you do not want to make use of the too, please refer to the commands included in theMakefile.- If you don’t have Golang installed, this is the moment. Click here and search for the latest version of Golang. Then, follow the installation steps.
-
Once you have golang installed, navigate to your riotpot folder
cd riotpot -
Now if you have make installed move to the next step. If you don’t know whether you have it installed type in your console and press enter. If you don’t see any message or you receive an error you will need to install
makeyourself.make -v(To install
makeyou can follow this thread) -
Once you have make, type in your console the following line. This will create the binary in the current folder and install riotpot in the system:
make riotpot-install -
Run riotpot and check the API!
riotpot start chrome.exe "http://localhost:2022/api/swagger/" - Run the UI webapp (optional, but recommended):
- Install Node.js
-
Create the build
cd ui npm run build npm install -g serve -
Start the site!
serve -s build
start chrome.exe "http://localhost:3000"
If this is too much, and you rather use Docker to run riotpot and all the other components, type in your terminal the following line:
make riotpot-up
This will run the docker-compose file, including TCPDump, riotpot, the webapp and a number of services in a private network to riotpot.
Riotpot will be accessible to attackers also, but the rest of the services won’t.
2.6 Next Steps
We are leaving RIoTPot at the stage of PoC (Proof of Concept). Many of the features will welcome a second round of reviewing, while the core functionalities of the honeypot have been implemented. Future developers will continue with the current setup, procuring the honeypot with a manageable CI/CD pipeline. Further development should focus on the honeypot and match the content in the UI. To make it comprehensive, we separated the list of next steps into the internal changes to the honeypot (riotpot) and the webapp (UI).
2.6.1 RIoTPot
-
Middlewares: One of the best ways to improve the sustainability of the system is to integrate middlewares that respect the resources of the system. Our first motive to include middlewares was to drop connections of attackers attempting to deplete the resources of the honeypot. In addition, middlewares should be a focal point for future development, giving RIoTPot the capacity to fingerprint attackers while they communicate with the honeypot. Other use cases may include upgrade connections to keep the attacker engaged with the system, or offshore connections to another system.
-
UDP Protocol: Although we have tested our implementation of the UDP proxy, the protocol is rather complex and may require extra attention. The implementation in golang seems straightforward, but it gave us multiple problems.
2.6.2 UI
-
CSS Love: Many UI components need to be formatted properly to follow the Figma mock. Due to the limited amount of time we had at the end of the project, we decided to prioritise other tasks over the general feeling of the components. Regardless, creating a consistent experience for the user is a priority that should not be overseen.
-
Feedback: The current state of the application does not provide feedback to the user on whether things are going the way they are supposed to. It would be beneficial to add visual feedback as simple notifications.
-
Connect the UI to TCPDump: While creating the mock, we discussed integrating ways to display the information from the
.pcapfiles in the UI. The mocks already show this intention, and it would be beneficial for the vision of RIoTPot, mapping attacks, fingerprinting attackers, and evaluating the performance of the honeypot using different configurations. However, this should be done concerning the user preferences and resources. Parsing.pcapfiles is usually known for being very power hungry!(An idea is to use the ELK stack to visualise the performance and place a link in the UI to a Kibana dashboard)
-
Service details page: As a nice to-have feature, we did not include this page in the UI. Future versions of the webapp must include this page as represented in the Figma mock.
2.6.3 Task load and prioritisation
The Gannt chart included below shows an estimation of the number of hours necessary to complete each of the previous tasks. The tasks in red must be given priority in the next versions of the application. Blue tasks represent “should have” features. The rest of the features can be given a lower priority, generally taken when other issues have been resolved. For example, creating new profiles is a relatively easy task that does not require large amounts of time and does not require any specific skill. However, including a large number of profiles may appeal to a larger audience to use RIoTPot. Regardless, this can serve as a guide to prioritise tasks depending on the resources available.

